Saturday, November 26, 2016

SOUPER Thanksgiving Leftovers!

The yearly challenge in the days after Thanksgiving is how to tastefully reinvent all the leftovers hogging up the room in your fridge.  One of the easiest meals to turn leftover meat into is soup.  I was feeling creative and wanted to see what I could come up with using my "inventory reduction" method.  I already had everything on hand with the exception of the spinach - which I thought would complete the "Christmasy" look of the soup.  This was the first time we had tried tortellini in soup, but the kids all loved it and asked for a second bowl!  There is just something decadent about the delicate cheesy noodle pillows that are tortellini...  Bonus - it was REALLY quick to make!


Turkey Tortellini Soup

2 T. Butter
1 Large onion, chopped
3 Cloves of garlic, minced
2 ½ Quarts chicken broth
2 Cups chopped Leftover Thanksgiving turkey (or however meaty you want it)
1 Pint grape or cherry tomatoes (cut into thirds)
1 Package frozen cheese tortellini (I used 19 oz.)
6 oz. Fresh spinach (or however much you want)
1 tsp. Italian Seasoning
½ tsp. Black pepper
Grated Parmesan Cheese

Melt butter in soup pot, saute onion until tender, add garlic and cook for an additional minute.  Pour in the chicken broth, chopped turkey, and tomatoes and bring to a boil.

Add tortellini and cook for about 3-4 minutes. Reduce heat and add spinach, Italian Seasoning, and pepper. Cook for another minute, just until spinach has wilted. Remove from heat and serve topped with grated Parmesan cheese.

In an alternate universe...

My ham leftover go to is Wild Rice Soup.  We have tried lots of different versions of Wild Rice Soup and keep coming back to this recipe smash up I created years ago!  This soup is a little more of a labor of love than the tortellini soup, but well worth the wait!  I typically double the recipe and freeze the second batch - wonderful to have on hand during the winter.


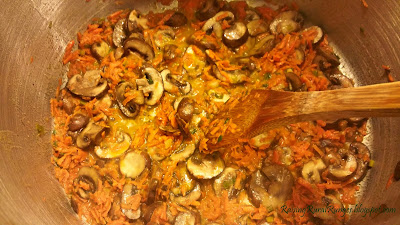
Melt some butter and saute some chopped up green onions...


some mushrooms...


and carrots...


until lovely and golden!


Stir in 1/3 cup flour and cook for a couple minutes...


it will be thick and bubbly.


Then stir in some chicken broth...


add in your leftover Thanksgiving ham...


and cooked wild rice...


then add some half and half and heat through.  Serve topped with some green onions, bacon bits, and The Pioneer Woman's Buttered Rosemary Rolls....YUMMM!


Wild Rice Soup

2 C. Cooked wild rice
6 T. Butter
4-5 Green onions, chopped, separated
1 C. Carrot, shredded
1 (8-oz.) Carton fresh mushrooms, sliced
1/3 C. Flour
4 C. Chicken broth 
1 C. Ham, diced (or however meaty you want it)
1/4 tsp. Black pepper
1 C. Half and half (or milk)
Bacon bits

Cook wild rice according to the package instructions so that you end up with approximately 2 cups of cooked rice (I've learned through experience they DO NOT all cook the same).  Meanwhile, in a soup kettle, melt the butter over medium heat and saute 3 of the chopped onions, shredded carrots, and sliced mushrooms until tender - about 5 minutes.  Stir in the flour and cook another 2-3 minutes until thick and bubbling.  Slowly add in the chicken broth while continuing to stir.  Cook until slightly thickened.  Reduce heat to low and add in the ham, pepper, and cooked wild rice.  Cover and simmer until ham is heated through.  Add the half and half and heat through - do not boil!  Serve garnished with the reserved onions and bacon bits.

Side note - you can totally make this soup by substituting pre-sliced fresh or canned mushrooms, cooked, cubed ham, shredded carrots, canned wild rice...all of it - and still make the same thing.

The other great thing about this soup is that if you want it thinner you can always add more half and half, milk, or chicken broth to thin it out.  It will get thicker as it sits or if you freeze it.

ENJOY!

Tuesday, November 22, 2016

2016 Brown Thanksgiving - Classy Runge Paper Bag Turkey

So things have been a little hectic lately and I know I still have 2 D.C. blogs left to do (we JUST survived anhydrous season, people!), but Thanksgiving deserves it's own time, too!  Scott & I volunteered to give my parents a break this year and host our very first Brown Thanksgiving this past Sunday!


I baked the ham on Friday night to get a jump on Sunday.  Everyone loved The Pioneer Woman's ham when I made it for Easter, so I just stuck with what works!


Then I made her cornbread for the stuffing - Yep, I pretty much would follow her off a cliff...


Saturday night we set the tables and made sure there would be room for everyone.  Kate was amazed to find out that fancy box that no one ever opens is full of silver - yes, we used China plates, too!  We DO have standards to uphold here! 😉


The girls had a great time setting and decorating the kid's table in the basement!


Then came Sunday - The BIG day!!!  My biggest fear was tackling a turkey and having it cooked on time.  My mother-in-law, Mary, told us how Aunt Mayme Blackstad used to always make the Thanksgiving turkey in a paper bag....  Wwwhhhaaaa????  So we totally researched it, and thus our Classy Paper Bag Turkey was born!  I mixed together some butter, salt, pepper, orange peel, and fresh rosemary and lathered it all over the outside of the turkey - this was Scott's first rendezvous with raw poultry, but I made him get all up close and personal!


After slathering the turkey with the butter mixture and filling the cavity with wonderfulness (orange, onion, rosemary, thyme, celery) we placed it in a brown grocery bag and folded over the end and thoroughly stapled it shut.


Then place it on a roasting pan and into the oven at 375 degrees for 13 minutes per pound.  DON'T OPEN THE OVEN TO CHECK ON IT!!!


Then I made the dressing...The Pioneer Woman's recipe, of course.


Into the baking pan!


Go Vikings!!!!


Keeley loves to make roux, so she was my go to gravy gal!


Bird is done!


Worse than expectant parents!!! 😂


The turkey was GORGEOUS and delicious and oh so moist!


Hungry Browns patiently waiting!


Jake was the first one through the line!


The dressing was beautiful!


Feeding time for the Browns!


The basement crowd.  The kids were seated at my Great Grandma Anderson's table in the basement - she would have loved to see her table full of their smiling faces!


Mom loved getting to sit down and enjoy a meal with all of her younger grandkids - and her turkey wing 😉


Payton wasted no time polishing off his huge drumstick!


The living room crowd.


Sit down already!


Of course Scott said, "Thanksgiving selfie?" and I couldn't refuse! 


The kitchen crowd.


This has NEVER happened before! Mom being the only one napping after Thanksgiving dinner!


Quality family time - the kitchen is the heart of the home!  All in all, we hosted a total of 26 Browns, in-laws, and friends - we could not have asked for a more perfect day!  Love you all and thanks for your help!

Now, if you want to make your turkey day super easy, here is how we went out on a limb and made ours!

Classy Runge Paper Bag Turkey

Combine the following in a bowl:  1 stick of softened butter, 1 tsp. salt, 1 tsp. pepper, the peel of an orange (use a vegetable peeler or knife), finely minced, and a couple of rosemary sprigs, stripped and minced. 

Spread all over the outside of the turkey skin - being sure to get all crevices.

Fill the cavity with the orange, quartered, an onion, quartered, some celery, rosemary, thyme,...whatever you want to fill it with!

Place the turkey into a brown paper grocery bag.  Fold over the end and thoroughly staple.  Place the turkey on a roasting pan so you can catch the drippings for gravy.

Bake the turkey at 375 degrees for 13 minutes per pound - don't peak or open the door!

Remove, check the internal temp to be sure it's fully cooked - 180 degrees, and let stand at least 10 minutes before carving.  Enjoy!!!!

HAPPY THANKSGIVING FROM RRR!!!!